Tips Feature
11 tips for shooting epic landscape photography
with Andrew Robertson
Landscape photographer Andrew Robertson explains the best techniques, lenses, camera and accessories for capturing wide-angle landscapes

'The Matterhorn of Lofoten', Canon EOS 5D Mark IV, 24-70mm, 1/25sec at f/11, ISO 250

1. Put some time into researching your locations to determine the best places to visit for wideangle landscapes
A vital step when deciding what to shoot is to spend a good amount of time immersing yourself in images, articles and websites that can give you a good idea of what to expect when you visit a location. In our connected age, there are plenty of places you can go if you want advice and ideas. Sites like Flickr and Photocrowd are a great resource for landscape photographers.
It’s particularly worth looking back over some of the competitions featured here on Photocrowd. Notable recent competitions include Landscapes in Black and White, Waterscapes, Moody Landscapes and Land Lovers
The thing to remember is that even if you intend to visit a location that had been shot several times before, there’s always a fresh angle to be found. Back in 2015, Andy Farrer won the Landscape Photographer of the Year competition by visiting the often-photographed Durdle Door, turning his back on the famous arches and shooting what was behind him.
‘One of the things I’ve learnt over the past couple of years is the importance of research and preparation for a shoot,’ says Andrew. ‘As you can see from my images, mountains are my favourite landscape elements to shoot and this is a subject that is particularly enhanced by the use of a wide-angle lens. As a former climber, I’ve spent a lot of time in the mountains and love to shoot there. Being based in London is not ideal for this but try to get to the hills a few times a year, whether that’s in the UK, Europe or Canada.
‘But before I set off anywhere, I put the hours in to plan and research my location, whether that’s the Dolomites in Italy or the incredible landscapes of Iceland. The internet is a full and powerful research tool. You’re just a few clicks away from resources like Google Earth and the Photographer’s Ephemeris, which can help you determine the best times of day to shoot if you’re looking for the sun to fall upon a location in a particular way. You should also spend some time looking at images that others have taken in the location.’

'Vestahorn', Canon EOS 5D Mark IV, 24-70mm, 1/2sec at f/16, ISO 100
2. Use a wideangle lens to give your images depth and emphasise the vastness
Your choice of lens is perhaps the most important consideration you can make as a landscape photographer. There are benefits to all types of lenses so it’s worth thinking about exactly how you want to represent a scene. A telephoto lens will compress your image and bring all the elements forward, leaving you with an image that can perhaps feel a little flat and cluttered. By using a wideangle lens, however (generally considered anything wider than 35mm on a full-frame camera), you can create an image that’s immersive and epic in its scope.
To put it simply, a wide-angle lens can help add a sense of depth to the image by making the horizon seem more distant. This gives the foreground, middle-ground, background and sky room to breathe. Shooting such wide-angle scenes will also reveal the incredible range of light found in such open locations. Some parts might be bathed in golden light, while others are in dark shadow, giving you a more three-dimensional shot. A wideangle lens, therefore, is the go-to lens for most landscape photographers.
‘My current lens is my Canon 24-70mm f2.8 III,’ says Andrew. ‘This lens is incredibly sharp throughout and is a joy to use. However, for some scenes, I will want to go a little wider. I also have an 11-24mm lens, which is an amazing lens, but it is rare that I would go below 14mm for landscape and using filters on this lens can tend to be a little fiddly, as well as cause vignetting. I’ve recently invested in a Canon 16-35mm f/2.8 III, which is another superb lens, much easier to use with filters and gives me the focal length coverage I require.’

'Spirit Island', Canon EOS 5D Mark IV, 16-35mm, 1/400sec at f/11, ISO 250
3. Be aware of lens distortion
Something that catches out some photographers using wideangle lenses is barrel distortion. This can mean that straight lines appear curved or bowed in the scene. One way of dealing with this is to use a rectilinear lens, a lens that has been specifically manufactured to cope with this kind of distortion and ensure that lines appear as straight as possible. There are a few of these on the market, such as the Sigma 12-24mm f/4.5-5.6 II DG HSM and the Canon EF 11-24mm f/4L USM so take some time investigating the right lens for your chosen camera.
These lenses do tend to be more expensive however, and as Andrew points out, lens distortion is easily fixed in post-processing. Photoshop has a neat little tool to help you correct any bowed lines that are ruining your composition. Simply got to Filter > Lens Correction and you’ll find yourself faced with several options to correct your image. There are plenty of options to work with here. You can either rely on the software’s presets or take control of its manually. It’s something worth experimenting with in order to get to grips with it.

'Arctic Yosemite', Canon EOS 5D Mark III, 24-70mm, 1/50sec at f/9, ISO 100
4. Recognise that there are benefits to distortion
Distortion need not always be a problem, though. The perspective distortion of a lens can actually do much to enhance an image. You can use it to almost exaggerate the size of your foreground objects, particularly if you get low to the ground. This will create the illusion that foreground objects are larger than they are in real life and, again, give your shots real depth. A wideangle lens can also give you visually interesting converging lines that will carry the viewer’s eye off into the distance.

'The Open Road', Canon EOS 5D Mark IV, 24-70mm, 1/125sec at f/9, ISO 200
5. Correct uneven light by using filters or post-processing
While a wideangle lens helps to emphasise the ranges of light in your scene, it can also cause problems when you’re looking for a more balanced approach to light. However, this is a problem easily fixed with filters, something that Andrew says every landscape photographer should have with them. There are many filters available on the market, the most popular being Lee Filters, which produces a range of filters to suit your needs.
If you’re facing issues with contrasts in your scene, particularly during the golden hours, then an ND grad filter is a popular choice. This will give you a good, well-balanced exposure. However, for other instances, many photographers instead choose to bracket their exposures and blend them in Photoshop. This a technique that more and more photographers are using, cutting out the expense of purchasing filters.
This involves creating two (sometimes three) exposures of the same scene – one for the darker areas (perhaps the foreground and middle-ground) and one for the lighter areas (most likely the sky). These images can then be blended in Photoshop to create a more balanced scene overall. The most important thing to remember here is that your images must be shot on a tripod to avoid your camera moving and creating images that will not match up in post.

'St Johann Chapel', Canon EOS 5D Mark IV, 24-70mm, 5/2sec at f/14, ISO 100
6. Use a polarising filter to make your colours pop and reduce reflections
It’s also worth mentioning polarising filters. If you’re shooting a scene with water, such as a river or lake, then a polarising filter will dramatically reduce the reflections meaning you can include the details beneath the water’s surface.
A polarising filter will also boost colour saturation giving your scene vivid blue skies, though the intensity of this varies depending on the angle of the sun. You’ll also see a noticeable effect on foliage, and the filter will give a real verdant effect to leaves, trees, grass and bushes. Most pleasingly, you can control the intensity of the colours by rotating the filter.
It’s worth keeping in mind that the effects of a polarising filter can only be achieved while you’re present at the scene. There is, unfortunately, no fix for this in post-processing so it’s certainly worth carrying around a polarising filter just in case.

'The Namib Desert', Panasonic DMC-GX1, 22mm, 1/500sec at f/10, ISO 160
7. Learn how to ‘see’ a scene and your favourite styles of composition
Landscape photography is about so much more than simply turning up to a scene, plonking your camera on a tripod and simply shooting what’s in front of you. No matter what genre you’re working in, every photographer will have their own style and favourite elements of a scene to focus on.
‘I bought my first DSLR in 2014 and have learnt a lot in that time,’ says Andrew. ‘These days, I do find myself thinking about and visualising my images beforehand. As a consequence, I almost shoot from the perspective of someone using film who only has a limited number of frames. This means I shoot less but the shots I have are exactly how I want them to look.
‘Typically, I will look for a striking subject and try to visualise and compose an image from there. It’s building an image from the ground up. I prefer using the viewfinder to compose, don’t consciously follow any set rules and try to use the elements of the scene as a guide.
‘I think the most common mistake that most people (myself included) make when they first buy a wide-angle lens is to try and fit too much into the frame. A wide angle can be very useful for this as it spaces everything out and also makes objects seem more distant. This puts more emphasis on your composition and means you can really get to work learning which sections of the scene to favour. It’s entirely personal.’

'The Flow', Canon EOS 5D Mark IV, 11-24mm, 120secs at f/13, ISO 100
8. Use smaller apertures and possibly focus stacking to achieve good depth of focus in your landscape images
Andrew recommends using a smaller aperture if you’re looking to get as much of your scene in focus as possible. In Andrew’s case, he will focus on the closest object of the scene – the foreground – and then set his aperture to around f/11 or f/14. However, there may be times when the foreground is a little too close to the lens meaning that some areas of your images are a little soft.
This is a problem easily fixed with focus stacking, where you can take several shots, each with a different layer of your image in focus (obviously make sure you’re shooting using a tripod and your camera does not move). These images can then be imported into Photoshop and stacked together to form one image. Just go to Edit > Auto Blend Layers and select Auto Stack. This final result will be sharp throughout.

'Niflheim', Canon EOS 5D Mark IV, 24-70mm, 401secs at f/16, ISO 100
9. Be prepared for a long wait to get the shot you want
If there’s one thing you’ll need – more than a good camera, lens and accessory – it’s patience. If you’re a truly dedicated landscape photographer, then you must be prepared to spend some time in your scene while you wait for the weather to clear (or perhaps get worse) and for the right type of light.
‘I think most landscape photographers will say the same thing, but the hours around sunrise and sunset when the light is normally a lot softer are my favourite times to shoot,’ says Andrew. ‘This isn’t always possible and sometimes the conditions are great throughout the day and, in fact, many of my favourite shots have been taken away from the golden hours. However, there are occasions when you really have to wait for the light to work with a scene in such a way that’s pleasing to you.
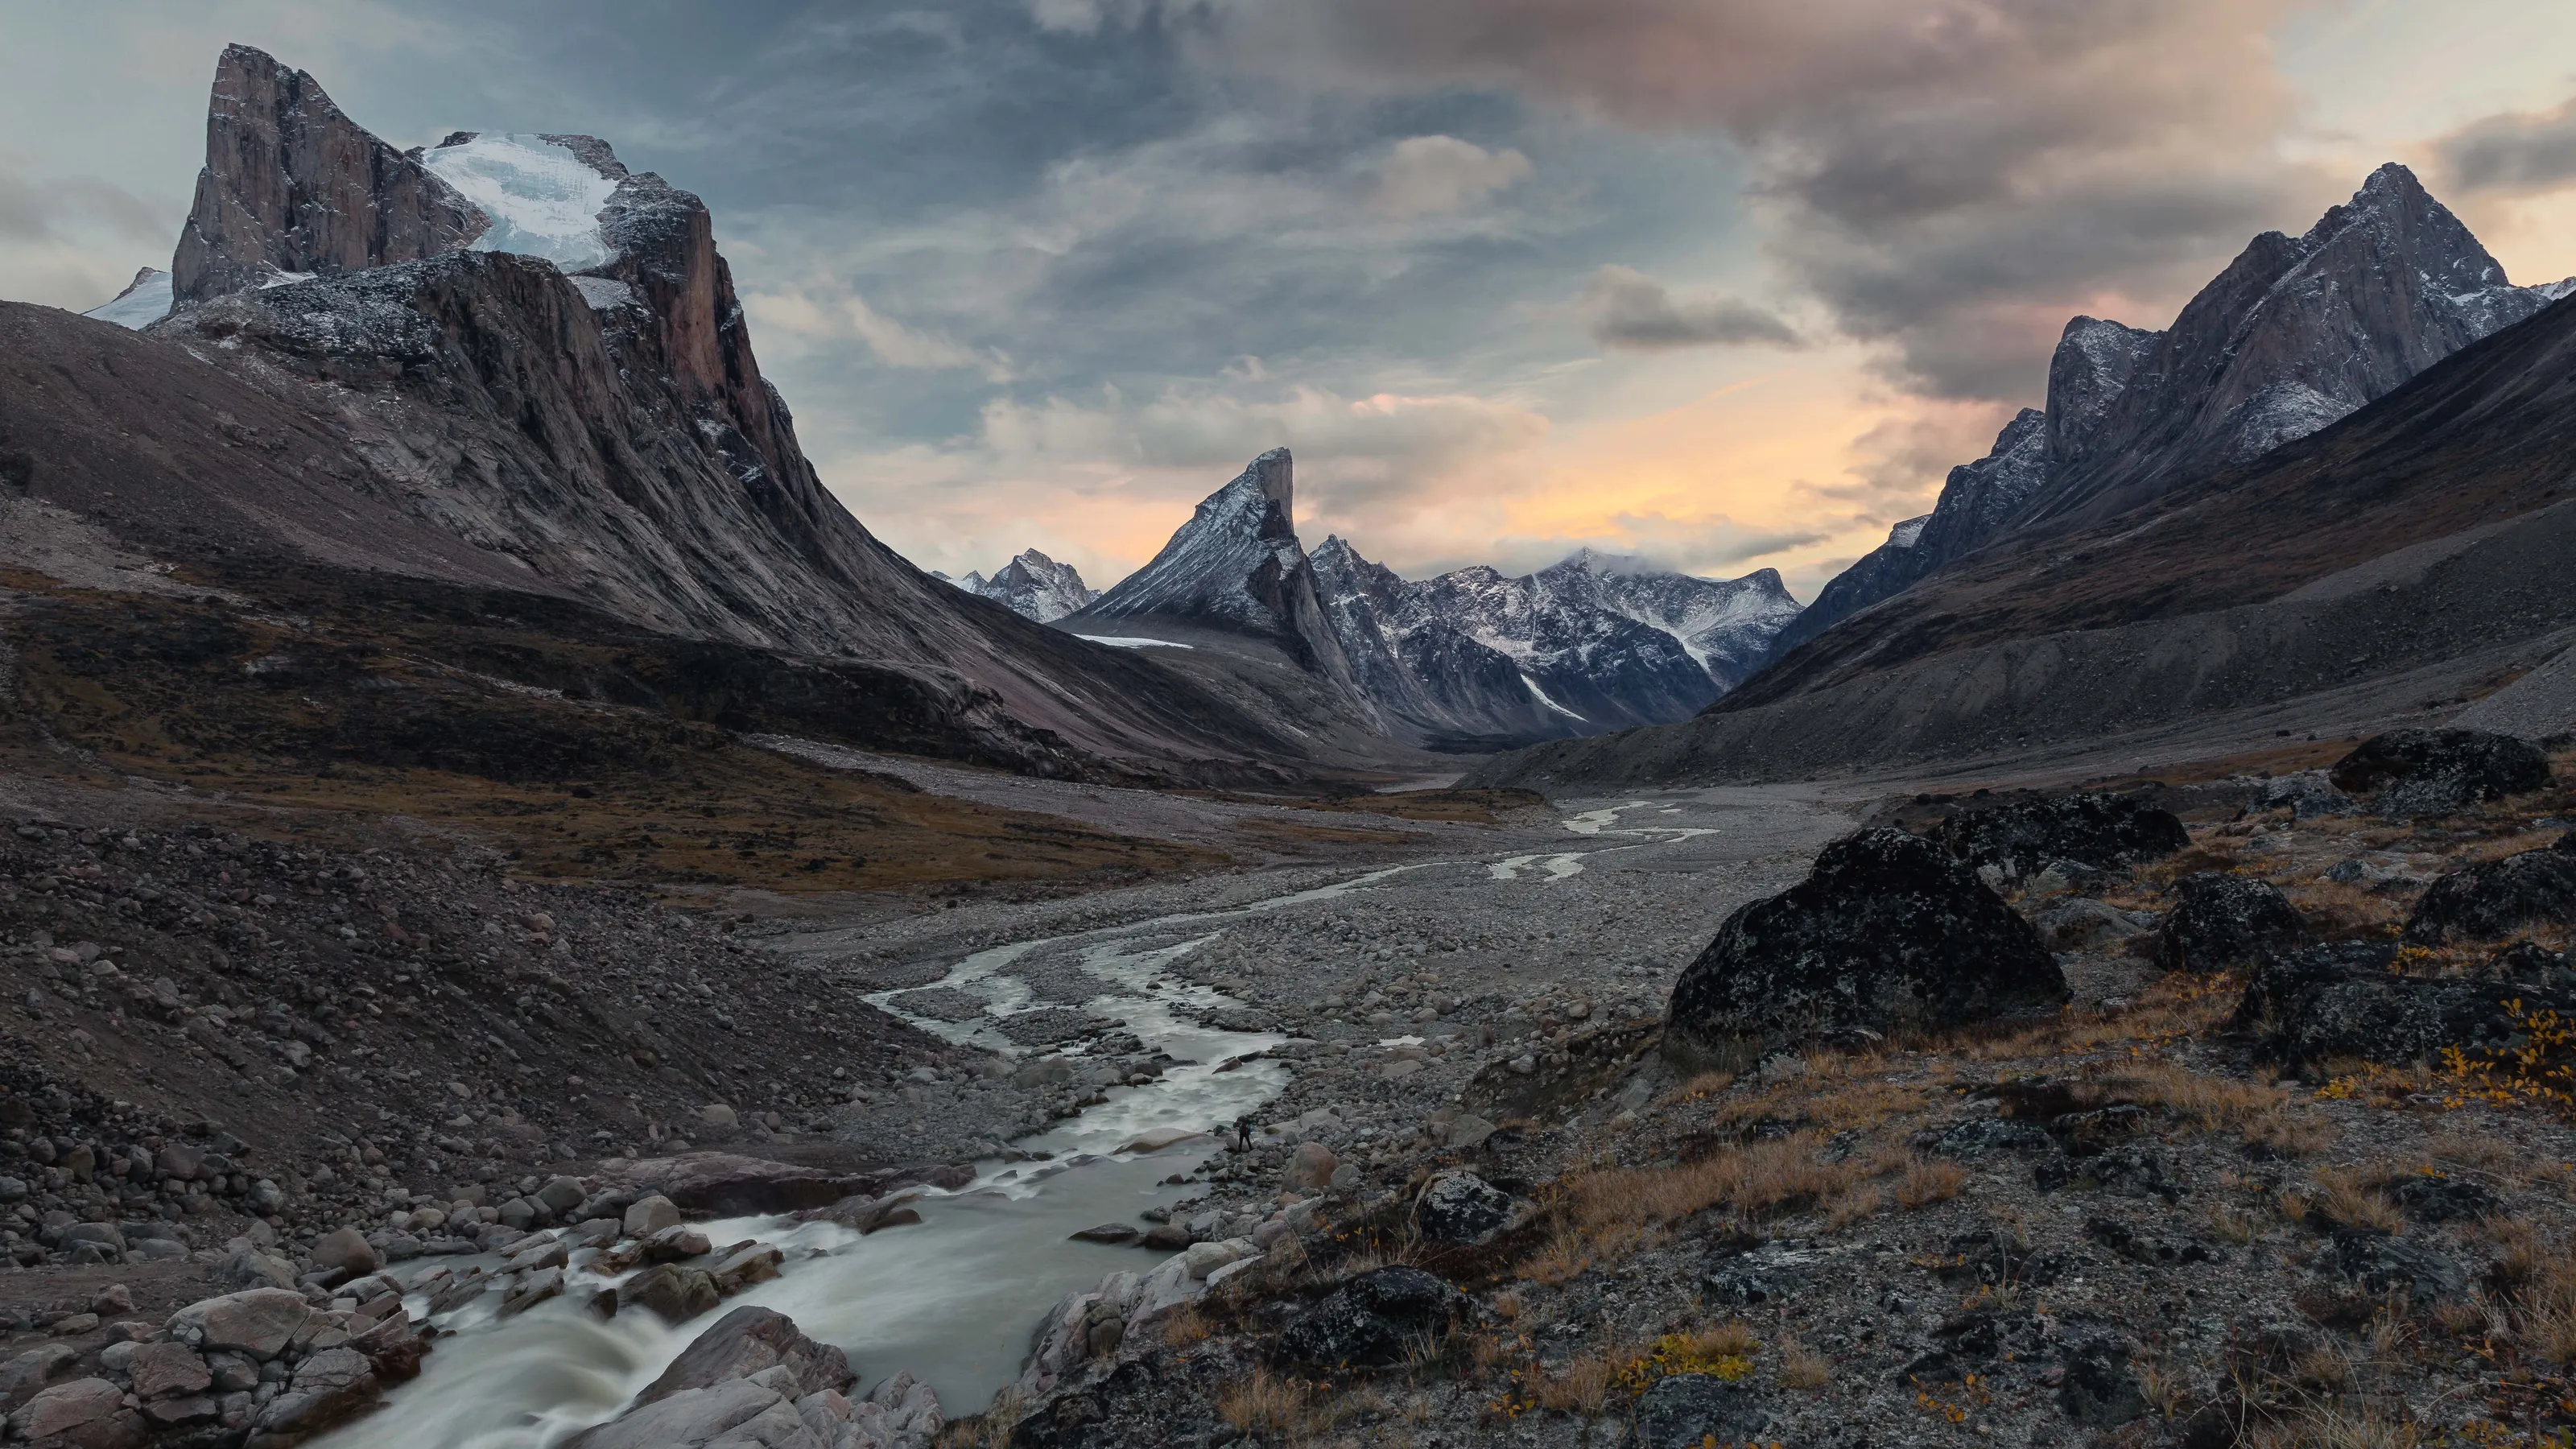
‘This image, shot on Baffin Island in the Canadian Arctic, is a personal favourite of mine. Aside from the fact it took many days to hike here, I just love the view so much. I actually spent two nights camping in the area looking for the composition and waiting for the light to be just right. I think the peaks in the background are really striking and I got down low to the riverbed to use the river as a line to lead through the shot.’

'The Valley of Thor', Canon EOS 5D Mark III, 24-70mm, 16/5sec at f/22, ISO 100
10. Use a full-frame sensor camera to get the best out of your landscape photography
Using a full-frame sensor camera is a bit of a no-brainer if you’re looking to create high-quality images of landscapes. More pixels mean more detail and more detail means your images will have more impact. This is particularly important if you’re taking the plunge and looking to make prints of your images.
‘I’m currently using a Canon EOS 5D Mark IV camera,’ says Andrew. ‘I like using a full-frame sensor for landscape photography and had previously used a Canon EOS 5D MkIII, which is a great camera, but the enhanced dynamic range in the Mark IV made the upgrade worthwhile for me.’

11. Keep your accessories simple
On the accessory side, Andrew prefers to keep it simple. It’s important to make sure you’re not weighed down with equipment, particularly when you’re marching up and down hills and mountains, as Andrew often is.
‘For landscape sessions, I will always bring graduated, polarising and ND filters plus a remote trigger and of course my tripod,’ says Andrew. ‘If it is an early or late session, a head torch, hat and gloves are absolutely essential.’

'Auyuittuq Panorama', Canon EOS 5D Mark III, 70-200mm, 1/8sec at f/14, ISO 100

Andrew Robertson
To see more of Andrew’s incredible work visit his website at http://www.andrewrobertsonphoto.com
If you’re looking to create your own shots of wideangle landscape photography, you can find some more inspiration on his Photocrowd page.