Tips Feature
How to Shoot Light Trails
Shooting traffic is an accessible way to achieve beautiful light trail photography and learn the fundamental rules of low-light and manual techniques. We look at the basics.
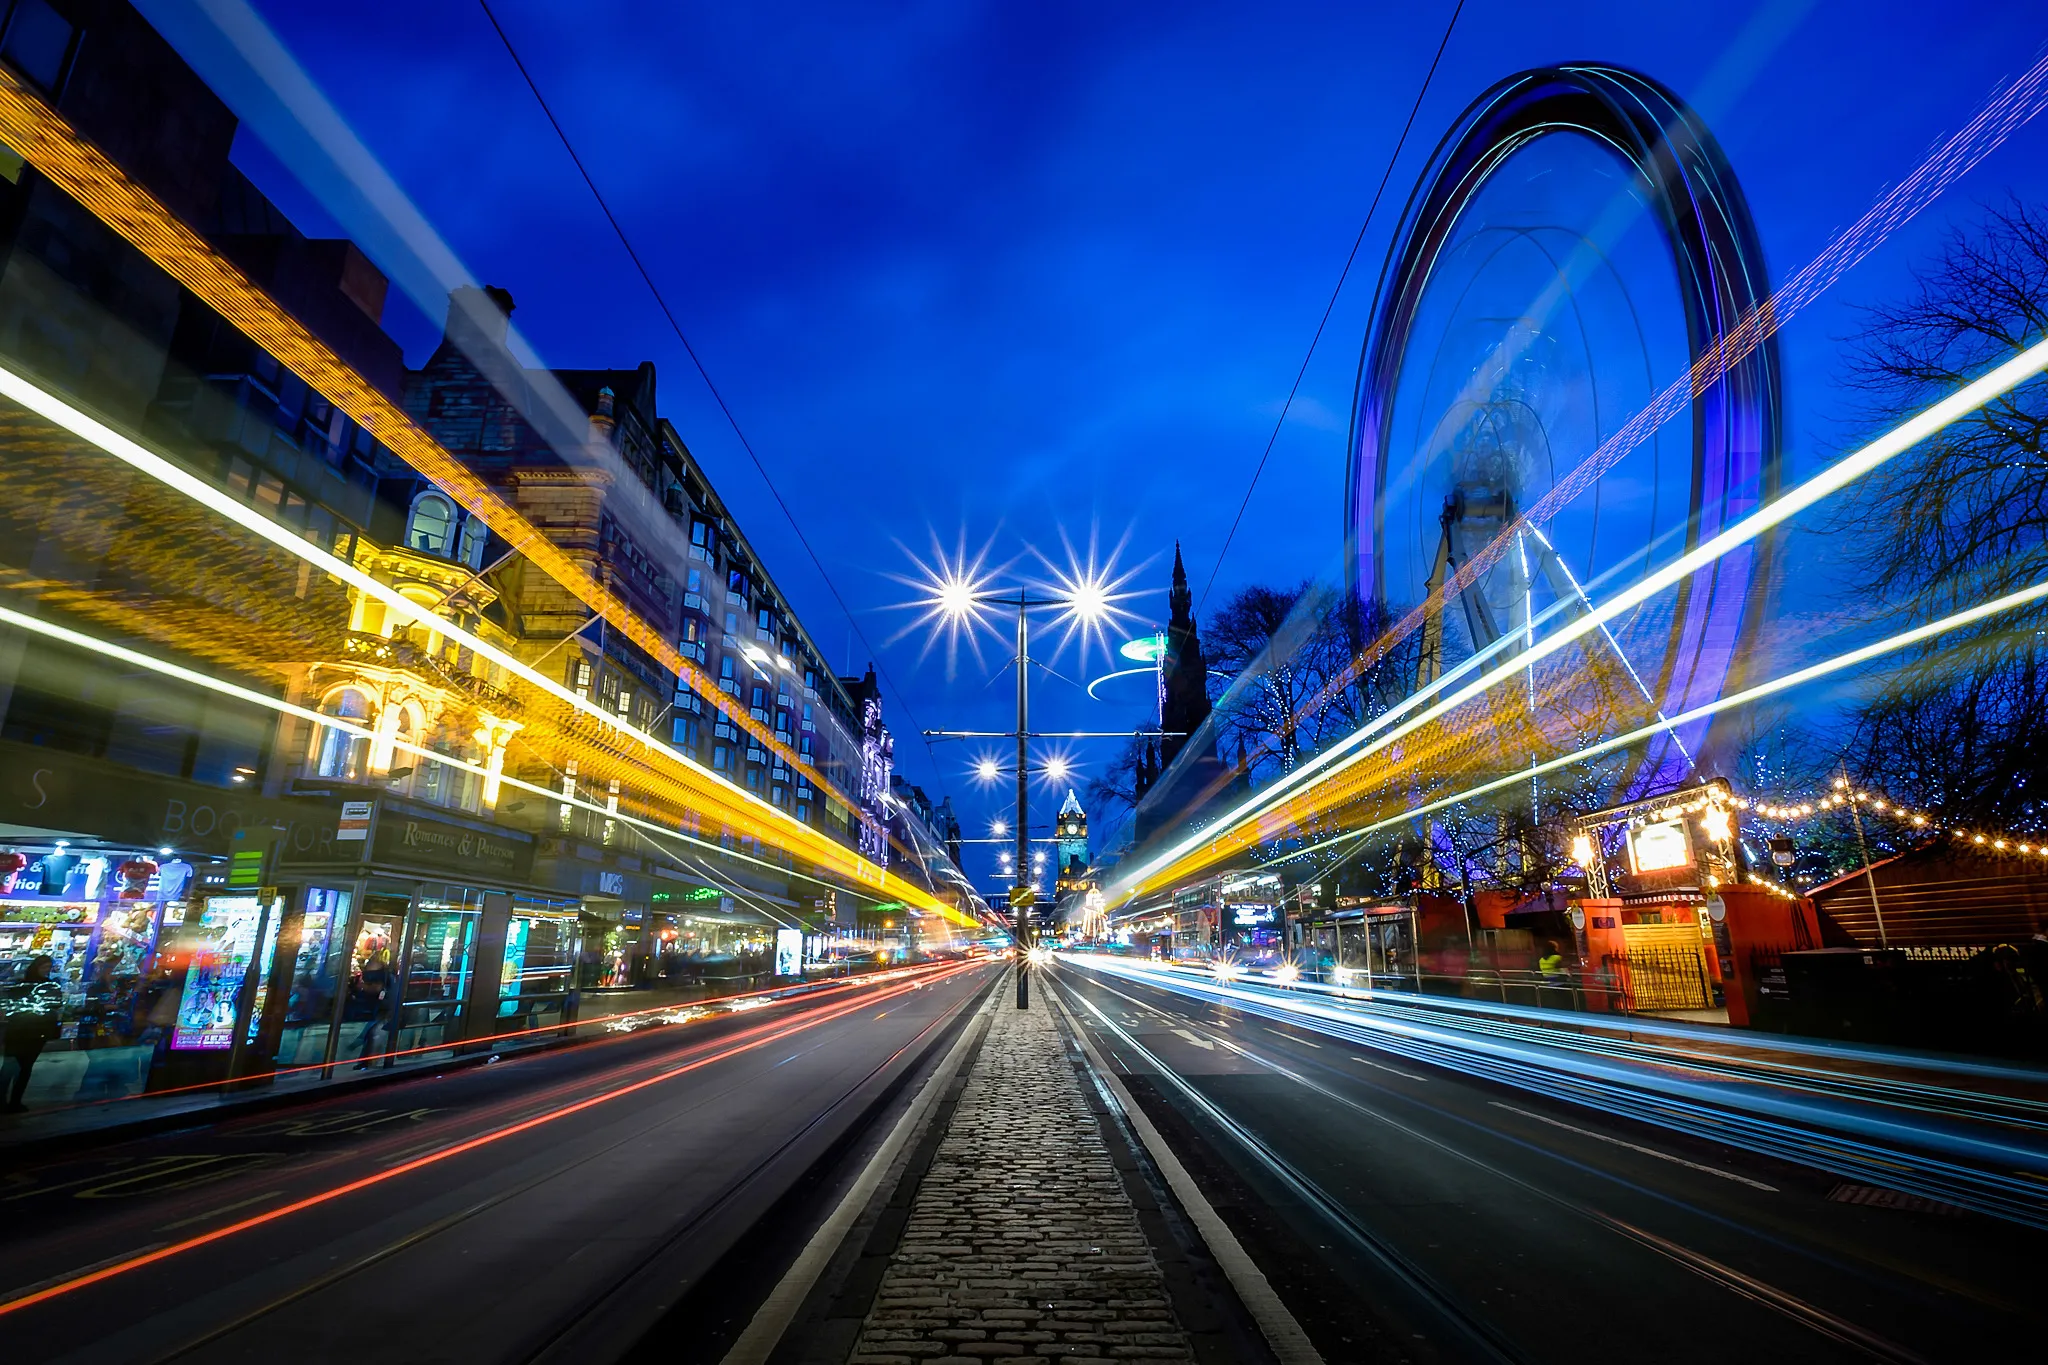
At some point, every photographer creates images featuring traffic trails. It’s a well-trodden path, as the vast majority of us live near roads or in built-up urban areas. While traffic trails are a great subject in themselves, they’re a particularly nice way to introduce you to the manual mode of your camera and will also give you some good training in low-light photography.
Photographing traffic trails is a simple and fun technique that can be done at all times of the year. We run through some quick and easy tips and look at some of the best images from Photocrowd users.

'Clarke Quay River Taxi' by Seow Swee Meng, Canon EOS 6D, 16-35mm, 30secs at f/11, ISO 100
- Gather the essential kit
Tripod
A tripod is vital. Shooting handheld with long shutters speeds will introduce camera shake into your image and ruin otherwise great shots.
Cable release or wireless remote
Avoid direct contact with your camera and reduce the risk of camera shake by using a cable release or wireless remote. This is particularly important if you’re using Bulb mode, which will mean having to manually keep the shutter pressed.
Lens hood
A lens hood is not strictly speaking an essential piece of kit but it can help to avoid lens flare from ambient light creeping into your image, a real issue in urban areas.
Comfortable shoes
A must for any genre of photography that involves going out on location. You’re likely to be walking around for a while attempting to find the right location, so make sure you have a good pair of shoes or boots.
Warm clothing
As well as comfortable shoes, it’s important to make sure you’re wrapped up warm, particularly if you’re working in the autumn and winter months.
Torch
You should also consider a torch to help you find your way around dark environments. You could perhaps use a headtorch to keep your hands free or use the a torch app on your phone.

'Light' by Philip Joyce, Sony ILCA-77M2, 100-300mm, 30secs at f/7.1, ISO 125

- Shoot just after sunset
While we often think of traffic-trail photography as a night-based genre, it’s better to think of it as evening-based. Shooting in the middle of the night means you’re likely to find less traffic. If you shoot just after sunset, you’re more likely to encounter the many cars returning from work, particularly if you live in a city.
Shooting around this time means you can, if you want, include a little ambient light in the sky, rather than the standard black sky we see in so many of these images.

'Ring of Light' by Kavin Koon, Canon EOS 6D, 11-16mm, 30secs at f/16, ISO 100
- Find an interesting location
Urban areas are good places to find unique angles and locations. Popular methods are to stand by the side of the road and photograph the traffic as it comes towards you, or you can find an overpass and angle your camera down at a busy motorway or main road.
Finding an even more elevated position can lead to some fantastic images, for example through a window looking down onto the city or, if you can find access, a roof.
That said, a light trail winding its way through a blackened landscape in the countryside can lead to a truly beautiful and atmospheric image.

'Arches Light' by Mike Stuckey, Nikon D750, 20mm, 15secs at f/5.6, ISO 250
- Don’t neglect the basic rules of composition
It can be easy to fall into the trap of relying on the aesthetic nature of light trails to carry the image and forget you still need to follow the basic rules of composition. Each image needs to follow such basic principles as the rule of thirds, compositional balance and feature points of interest, and include an interesting foreground and background. Don’t forget that as the traffic trails will be the most striking component of your image, they will become the most important compositional element of your shot. You’ll need to previsualise your shot before even pressing the shutter.

'Big Ben and Westminster' by George Papapostolou, Nikon D610, 16-35mm, 10secs at f/13, ISO 100
- Work in manual mode
Shooting traffic trails requires you to achieve maximum control over your shutter, aperture and ISO. That means it’s vital you work in manual mode. While you could set your camera to shutter priority (traffic trails, of course, rely on long shutter speeds), it’s better to make the leap and step into manual mode. Shutter priority mode will not guarantee the right exposure in dark conditions, and is usually limited to 30secs, which might not be enough, depending on the aperture being used.

'Las Toscas Orange Streak' by Ondre Nowakowski, exposure unknown
- Experiment with long shutter speeds
Technically, there’s no right or wrong shutter speed. Begin with an exposure of 5secs and work your way up in increments of five. The higher your shutter speed, the more likely you are to achieve the desired long streaks of light – anything lower than 5secs may lead to broken light trails. What you’re looking for are long, consistent streams of light. Many light trail photographers tend to stick to the tried-and-tested 30sec shutter speeds, so you may find yourself producing quite long exposures.
The thing to remember is that as the duration of your shutter speed increases, the lighter your image will become. So to keep the exposure where you want it, you can close down the aperture, or lower the ISO if possible.

'Charing Cross' by John Pow, Nikon D810, 16-35mm, 25secs at f/11, ISO 64
- Shoot in Bulb Mode for exposures longer that 30secs
There may be occasions when a thirty-second exposure isn’t quite enough to achieve the trails you’re looking for. In these circumstances, you can set your camera to Bulb mode. Making sure your camera is set to Manual, keep turning the shutter dial until you reach 30secs. Then turn again until your camera display says Bulb.
With this option set, you can keep your shutter pressed for as long as you want – minutes rather than seconds, if you so desire. Your shutter will now remain open for as long as you’re keeping the shutter button pressed down. This is why it’s vital to carry a shutter release or wireless remote, otherwise, your hand will be on the camera for an extended period of time and, particularly in cold conditions, will cause your camera to shake.

'Trollstigen' by Christoph Schaarschmidt, Canon EOS 7D, 11-16mm, 30secs at f/8, ISO 100
- Close down your aperture
You’ll want as much of your image to be in focus as possible, particularly in urban areas that feature strong foregrounds and backgrounds. Close your aperture down to around f/8 or f/16.

'Tram Sandwich' by David Queenan, Fujifilm X-E2, 10-24mm, 15secs at f/22, ISO 200
- Set your ISO low
As you’ll be working with long shutter speeds, you can set your camera to as low as ISO 100 or 200. This will mean the blacks of your image are free and clean of noise. However, many newer DSLRs are notable for their ability to handle high noise-free ISOs so perhaps put your camera to the test before going on location.

'Live at the Apollo' by Chris Evans, Canon EOS 70D, 10-22mm, 30secs at f/20, ISO 100
- Learn to use your histogram
If you’re working in a town or city, your image will likely include various competing light sources. This carries the risk of some areas of your image becoming burned out. This will cause a lot of distraction for the viewer.
Make sure you check your camera’s histogram. If there is a spike of information predominately towards the right-side, then your image will be light; pushed towards the left, the image will be dark. Truthfully, there’s no ideal histogram display – it’s just a matter of making sure the tones are not right up against the left or right edge and are definitely not clipped. If this happens, simply adjust your aperture or exposure compensation.
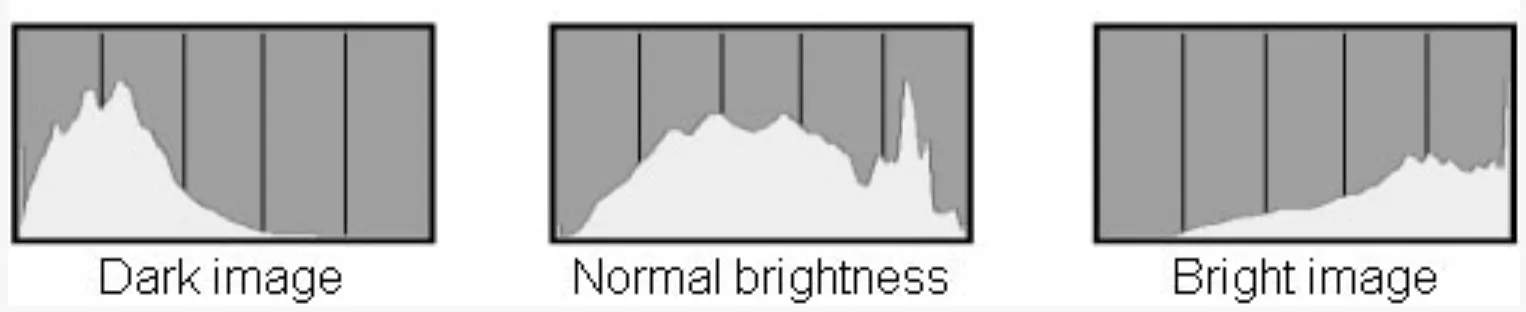
source: http://support-th.canon-asia.com
- Use manual focus
As you’re working at night, your camera’s autofocus may struggle to adapt to the low-light conditions. You’ll need to set your lens to manual focus. Rather than attempting to focus through the viewfinder, use Live View, zoom into the image and then focus on the point where your traffic trails will appear. This will give you a much clearer picture and allow you to focus accurately on the details of the scene.

'The Perfect Storm' by Peter Földiak, exposure unknown
- Set your camera’s white balance to tungsten/incandescent
If you’re shooting in the city, you’ll be faced with a series of artificial lights that will throw strange colour casts onto your image. Rather than relying on auto white balance, set your camera to the tungsten or incandescent setting.

'S-Curve' by Verity Milligan, Canon EOS 5D Mark IV, 24mm, 67secs at f/11, ISO 100
13. Shoot raw files
Shooting raw will give you much more control if you need to fix any white balance or exposure issues. It will also make it a lot easier if you need to recover any details lost in any underexposed areas.

'The Photographer' by Nawfal Jirjees, Canon EOS 5D Mark III, 24-70mm, 6secs at f/10, ISO 200
