Tips Feature
A Beginner’s Guide to Stitched Panoramic Photography
with Chris Pegman
Sometimes epic landscapes require a wider field of view. Chris Pegman takes you through his tips for creating successful panoramic images.

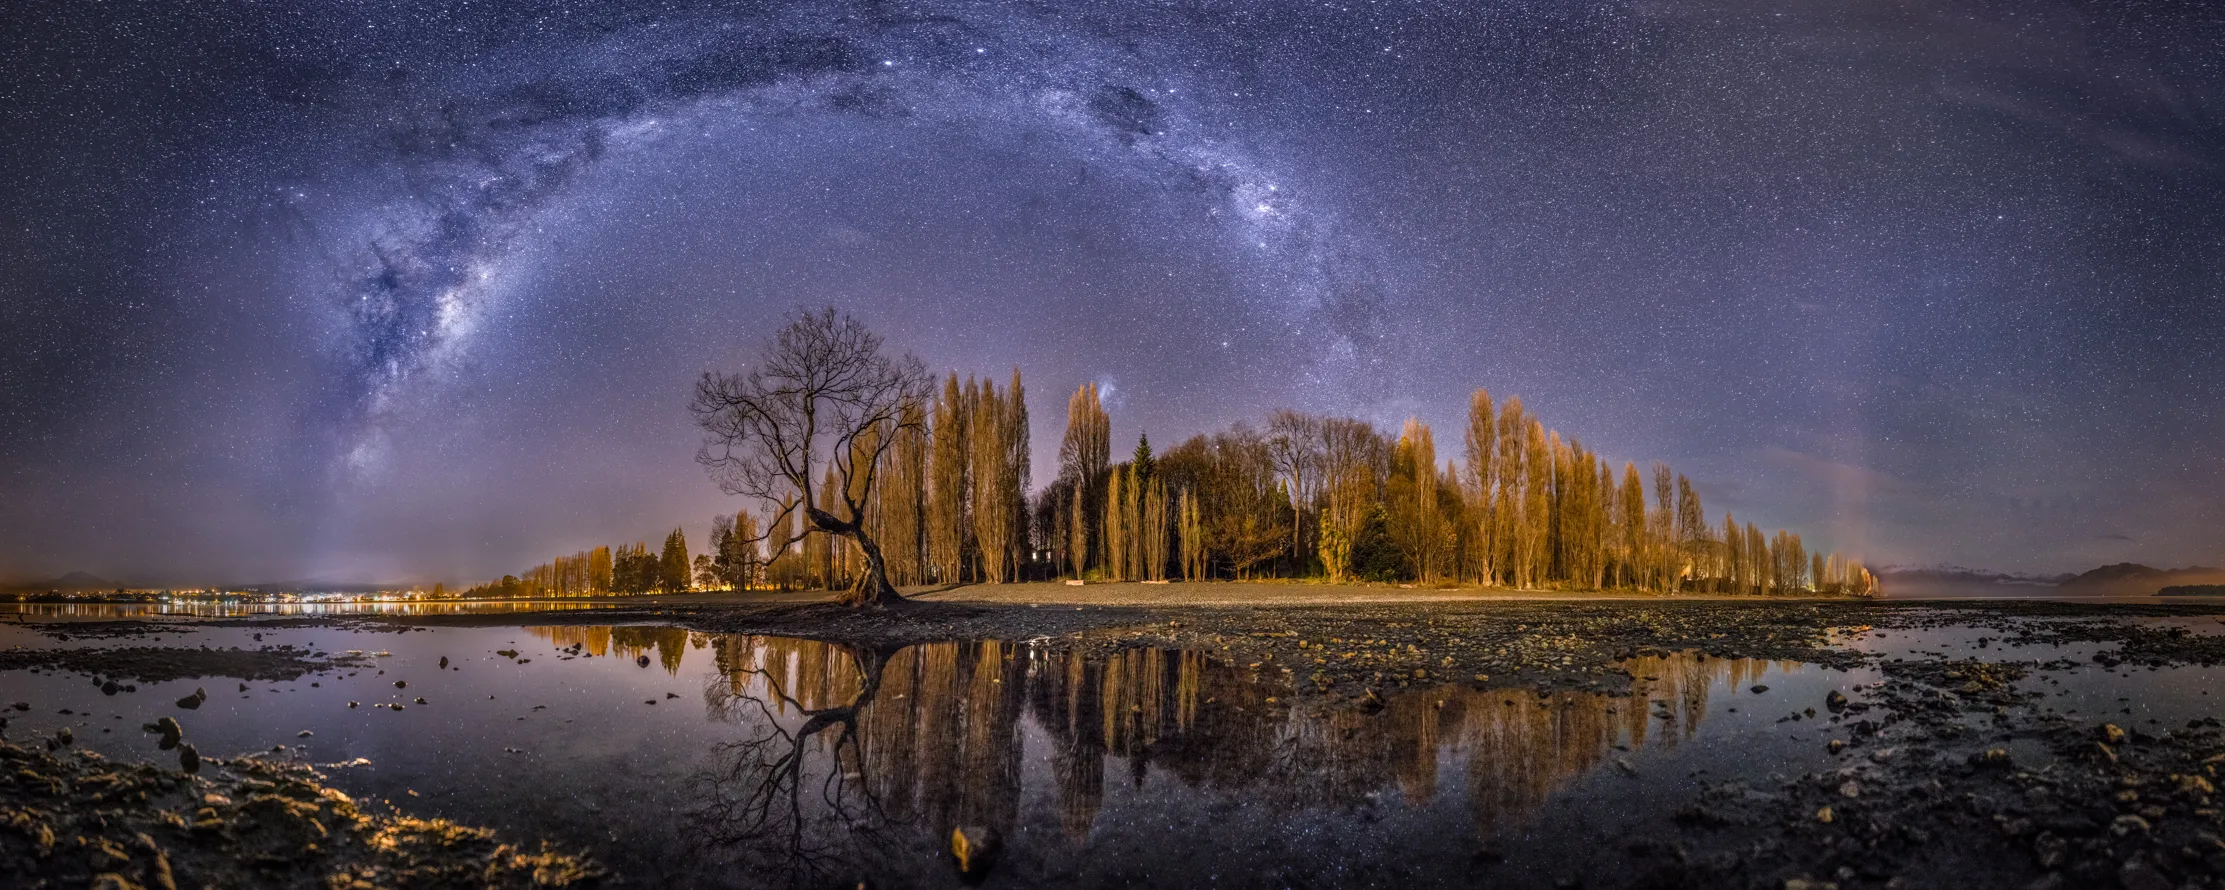
Inside the Archway
While wideangle lenses are great for shooting epic scenes – visit our guide to shooting wideangle landscapes – there are times when you’ll want to go beyond the field of view of your chosen lens. Thankfully, there is a technique to help you with this – stitched panoramas. This involves taking a series of images of the scene and then ‘stitching’ them together using either the in-built function of Photocrowd or Lightroom, or using dedicated software such as PTGui Pro. These individual shots form rows of images that when blended together form a much wider view of the scene and can also give you a complete 180- or 360-degree view of the landscape.
It sounds challenging but it is in fact a simple procedure. You can use either a wideangle or telephoto lens and there are plenty of accessories on the market to assist you. Here, landscape photographer Chris Pegman offers some words of advice.
1. Look into the accessories that can help you create stitched panoramic shots
While it’s perfectly possible to shoot your stitched images handheld, there are some accessories that can help you create professional-looking panoramas. Chris suggests looking into the following:
A solid tripod
‘If you’re looking for a tripod you’ll need one that’s going to stay in one place and provide level and balance. If you’re shooting 20sec exposures, for example, this solid foundation becomes critical. I use a Sirui tripod. It’s waterproof, which is great for when you’re shooting around water. It’s also carbon fibre, so it’s lightweight when you’re hiking to the location.’
Novoflex Magic Balance
‘This means I can easily set a level base – an uneven base gives you a wave-like panoramic image that often you can’t correct.’
Novoflex VR Slim Panoramic Kit
‘This allows me to take each image in a way that means they will stitch together with ease. I won’t have to face problems such as mismatched joins. You use it to tilt the housed camera up and down for upper and lower rows of a panorama. There is a click-stop swivel base you can set according to the lens you are using to achieve the crucial image overlap. The Novoflex VR Slim is sturdy but light so, again, this is great for keeping the weight light when hiking.’
Hand warmers to heat your lenses
‘I particularly like the air-activated charcoal hand warmers which are wrapped over the front of the lens using Velcro. This is fantastic for preventing lens fog, which can particularly happen at night. There are more sophisticated battery methods, but I’m using this one right now.’


2. Choose the right lens for your scene
Due to the scope of view it offers, Chris favours a Nikkor AFS 24mm f/1.4G ED on a Nikon D850 full-frame DSLR. However, many instead choose to shoot with longer lenses – popular lengths include the 35mm, 50mm or 85mm. These lenses deliver ample coverage in each frame (important for including plenty of foreground and background) and will be less likely to suffer from image distortion, which can sometimes occur with shorter lenses. Using a wideangle also means you will shoot fewer images for your composite as each frame will include more content.
You might also consider telephoto lenses such as a 70-200mm or 24-105mm lens if you’re looking to zoom into a landscape and create a pan-stitch that captures the distant details of a scene such as a tree line or hills. Where a wideangle will give your image depth by pushing the background elements further away, a telephoto lens will pull the elements of the scene forward and make the composition feel flatter.
However, bear in mind that if you’re still looking to create a particularly wide view of the scene, using a telephoto means having to take more images.

Shakti No.1 (Where's Wally/Waldo)
3. Shoot your images by panning from one end to the other
The number of images you shoot will vary according to the scene, your choice of lens and how much of it you want to show. To shoot your individual images, point your lens to the one side of the scene (this will be your first image) and press the shutter. Then pan from one image to the next make sure the centre point of focus of your first scene is nearing the left-hand edge of your second. This will give you a 50% overlap between the images. Having this overlap will make it far easier to blend the images together when it comes to stitching in post-production. Keep shooting until you reach the other side of the scene. Navigate through the images on the back of your LCD screen and check each image has been shot correctly. This is where you can spot any errors in alignment and exposure.

Over the Iceberg
4. Consider shooting handheld
Not everyone wants to splash out for accessories. There’s nothing wrong with shooting handheld and many find the results more than pleasing.
Keep your viewfinder pressed to your eye and pan left to right, using the horizon as a guide for keeping your images level. Keep your elbows close to your sides and use the upper part of your body to rotate. The important thing is to keep steady. Think of yourself as the tripod.

Over The Moon, Edmonds Lake
5. Shoot in manual mode
Always shoot your images in manual mode. As light can vary across the scene, you’ll need to ensure your exposures are consistent in every shot you take. That means not relying on aperture or shutter priority modes. The exposure value of each shot must match, or you’ll be left with a final image that simply doesn’t work due to the patchwork exposures. This also extends to focus. Set your lens to manual so the focus of each image remains consistent throughout.

Fresh
6. Use long exposures if you’re shooting seascapes
One quick piece of wisdom that Chris is keen to impart is that if you’re shooting seascapes then it’s crucial that you shoot long exposures. This will blur the water and make it a uniform shape and texture. This will make it a great deal easier to match up the images when it comes to creating your final image.

Breathe
7. Use Photoshop or Lightroom to stitch your images
Once Chris has shot his image, he must then set upon the task of stitching together his shots to produce his final panoramic image. Every photographer will have their own approach to this part of the process so it’s worth looking into the systems of more than one photographer.
Many photographers choose to rely on the tried and tested function found in Photoshop, which you can find under File > Automate > Photomerge. In Lightroom go to Photo > Photo Merge > Panorama. You will then find a few simple options to play with depending on what you want from your final image.
This may take a while depending on the number of images you’re stitching together. Your final image will then need to be cropped to remove any unwanted white space around the image.
8. Look into dedicated stitching software
Some photographers prefer to take a bit more control over their pan-stitch images. The post-production panoramic programme that Chris favours is PTGui Pro, a stitching software that has grown in popularity over the last decade due to its ability to mask out unwanted elements, manually edit control points, straighten horizons and work with multi-layered images. It’s an incredibly user-friendly piece of software and has many more options than Adobe software meaning you have more control over the final image.
There are plenty of other options available, though. You could consider looking into:
– AutoPano Pro
– Panorama Stitcher
– iFoto Stitcher
– Hugin
– AutoStitch
– GigaPan Stitch
– Microsoft ICE

Moonrise Urupukapuka Bay

